Archive
Beyond MIDI with Synthfont
So what do you do with a MIDI file that sounds1 like a cheap toy when played with your computer? Load it on Synthfont!
There are a lot of suspicious websites and software out there when you search for “MIDI to MP3”. I doubt that most of them would improve the sound quality. They just convert the format, and you have no control over how the resulting MP3 file sounds. Although they may serve the purpose of making your arranged music more compatible to more players and devices, it is still painful to listen to. In many cases, you simply have a much bigger file.
This is why it is better to go beyond a passive format conversion and take control of the process. Give your hard work the quality it deserves. It is also a fun learning experience that can open doors to new hobbies or even new career opportunities. Knowing that you can create high quality music tracks, with just your computer, is quite empowering.
Even if you can tweak the MIDI further through automation and control changes, it is not very motivating if the instruments still sound bad (just like how having a bad sounding real musical instrument discourages you from playing it). Also, there are many instruments or instrument ensembles that are not included in the General MIDI specification. What concerns me most, is that you don’t have ensembles for violins, violas, cellos and contrabasses. Instead you have generic “strings” (instruments 48 to 51).
A Beginner’s DAW
After being initially discouraged by the complexity and bloat of other free digital audio work stations (DAWs), I eventually found something that simply does what I want to do. Synthfont makes it straightforward to apply soundfonts and VSTs to an existing MIDI file. It is “MIDI-centric” not containing audio editing/recording functions like those found in audio editors like Audacity or Wavosaur. It is also not bundled with annoying loops and samples that you’ll never use. (I find it both ridiculous and discouraging how some DAWs boast that they are bundled with gigabytes of samples).
Getting better sounds using soundfonts and VSTs
To demonstrate a simple comparison, the MIDI resulting from the previous Sekaiju tutorial was modified. Notes were made shorter than notated to emulate the player’pauses. The chords were voiced out and split to different string instruments. Slightly higher velocities were also assigned to shorter notes. Below, you can listen to two versions of the same MIDI file. One is rendered with Window’s default synth while the other is rendered using free soundfonts and VSTs from the web.

Silent Night in Synthfont using custom soundfonts, VST instuments and a reverb VST effect.
-
Rendered2 using GM.DLS3 found in “WINDOWS\system32\drivers\”. This is how it would have normally sounded if played directly as MIDI file with the default Windows sounds.
-
Now, this version uses custom soundfonts, VSTis, and VST effects.
The following were used:
- Flute: Cambridge Concert Flute [1,2]
- Violins & Violas: DSK Strings
- Cellos & Basses: Sonatina Symphonic Orchestra
- Reverb: FreeverbToo
Although the second example is far from the best possible result, it is much more pleasing than the first one. Normally, I’d spend more hours until I become happy with the results, but I have a self imposed Christmas deadline. Like any artwork, a good musical arrangement should take its time. There are also a lot of free soundfonts and VSTs out there, aside from what I’ve used. So there is plenty of room for experimentation and improvement.
Similarly, there are also other good DAWs out there, both free and commercial. But back then, when I was starting, the other free alternatives were not the easiest to learn, and were a bit overkill. Hence, Synthfont, because of it’s “plug and play” paradigm and ease of use with existing MIDI files made it a winner for a beginner “DAW-ist” like me (wow, that sounds like some kind of religion). Its website actually has a tutorial, but I never really read it as things are quite straight forward to figure out. On the funny side, I always discover something new because I never really read the tutorial. :P This just shows that I don’t have to ingest tons of information before I can get satisfactory results.
Other tools of the trade:
These are little tools frequently used for other practical stuff when creating MP3 files. Their functions can also probably be done through Synthfont, but it is just far more intuitive to use dedicated tools. Furthermore, they can be used independently of what other software you use to create MP3 files.
- Mp3 Gain: Normalize the volume of your Mp3 file, so you don’t have to adjust the volume when your player goes through different files. 92 dB is standard while softer pieces such as piano solos seem to go well with 89dB.
- Mp3 Tag: Add more meaningful extra information in your MP3 file. Let people know where it came from.
Foot notes:
- The sounds are NOT in the MIDI file. But we commonly associate cheesy sounds with MIDI files because of the Roland GS Sound Set used by the Windows SW Synth (which dates back to 1996).
- This defeats the purpose of using Synthfont. But I think it is more preferable to do it this way compared to installing one of the many other competing not-so-well-known converters you may find online.
- It is possible to replace GM.DLS and get better default MIDI sounds.
Happy holidays/music making!
Sekaiju tutorial: A simple example (Part III)
Introduction
It’s been a month since I had written Part II of this tutorial back in Hungary, and Christmas is now a few days ahead. By now, Sekaiju 3.4 is already released with a few added features and bug fixes. So now, I finally had enough pressure to finish the Silent Night midi project I’m working on. One of the reasons for this great delay is that I would rather use other free music notation tools such as MuseScore, Finale Notepad or Musink which I just recently discovered. Another is I would guess that many DAW oriented users do most of their work through the Piano Roll, which was already discussed. Anyway, enough of these excuses. Let’s just finish this tutorial series and enjoy the holidays!
If you haven’t seen them yet, I would suggest you go through the following tutorials:
- Sekaiju Tutorial: User Interface to learn the basics of using the Sekaiju MIDI editor.
- Sekaiju tutorial: A simple example (Part I) which tells how to start making a MIDI file.
- Sekaiju tutorial: A simple example (Part II) which discusses note entry via the Piano roll.
Again, here is the basis of the MIDI file we’re building from scratch. Since this part would be about using the Musical score editor, we just copy the score directly as we see it. Perhaps, one motivation for using a MIDI editor instead of a dedicated notation editor is that you can further tweak the notes in the Piano roll, deviating a bit from notation to make it sound more human and expressive, since as I had mentioned before, MIDI and music notation are not equivalent. As we chose the key of C, there is no key signature indicated on the score.

Silent Night by Franz Gruber, from Wikifonia. [Published by benoit on December 14, 2006 © reserved by Musicopy]
Creating notes through the Musical Score
Showing the Musical Score window
If you have the file (from the previous tutorials) opened, a Musical Score representation can be shown by selecting the “Show new Musical Score Window” button (♫) in the main toolbar or in the “View” menu.
Basic editing tools
Minus the Line tool, the editing tools in the Musical Score window are mostly identical to those found on the Piano Roll. The major difference is that you can not resize a note by dragging. Instead, you select the notation symbols that correspond to the note length you want to use.
Toolbar Buttons found in both Musical Score and Piano Roll windows. From left to right:Pen, Erase, Select and Preview.
The buttons are the Pen, Line, Erase, Select and Preview. When selected, these buttons do the following:
- Pen:
- Draws a new note with a pitch determined by its position and duration by the the selected note symbol
- Eraser:
- Erases an existing note.
- Select:
- Selects multiple notes and allows multiple notes to be simultaneously moved.
- Also works for a single note.
- Allows keyboard or menu actions like Copy, Cut, Delete to the selected notes.
- Preview
- Plays existing notes when the cursor is dragged on top of them (you will see a vertical line).
Towards the right of the toolbar, length indicating music symbols can be seen:

Buttons for selecting the note length: Whole Note, Half Note,Quarter Note, Quaver Note, Semi-Quaver Note, Demi-Semi-Quaver Note and Dotted/ Triplet modifiers
These buttons determine the length of the note that is added when using the Pen Tool. The first 6 buttons, are the (common?) note lengths.While the last two, the “dot” and “triplet” modifies whichever note you have selected among the first 6 buttons.
Entering notes through the Musical Score interface.
Continuing the flute (melody) track
1. From our previous work, look at the staff corresponding to the Flute track. It should be easy with the tracks labeled. There is no need to explicitly select the track as notes are entered on the staff that you click, and the staves are already separated for each instrument (unlike in the Piano Roll where all the track’s notes are using the same workspace). If you add a note on a staff of a different instrument, that instrument’s track gets selected.
2. Zoom to a comfortable level by clicking the plus or minus (“+” or “-“) buttons at the lower right corner along the scroll bars or by using “Ctrl +” or “Ctrl -” shortcut keys.
3. Set the position quantization. Since the smallest note is an eight note or quaver (♪) and the notes on the song are multiples of a semiquaver, we could choose 60-Quaver from Snap dropdown (third). We have to do this because, unlike other score editors, note entry is position dependent. For example, if you create a whole note on an empty bar and click somewhere in the middle, the whole note will start roughly where you clicked and go beyond the bar, causing tied notes instead.
4. Use the beat markers as guides. Note that in each bar/measure (bounded by blue vertical lines), there are 3 vertical gray lines. This indicates the beats in our 3/4 time signatured-song. Also use the measure numbers as a guide.
5. Choose the Pen tool and select a note symbol corresponding to the note length you want to enter. Since we are using a music sheet as a guide, we simply copy the note symbols as we edit. Enter the note with the correct length by clicking on the appropriate location on the staff. Remember that note entry is position dependent (like in the Piano Roll).
Dotted notes and triplets are obtained by pressing down one note length then also pressing down either the dot (“.”) or triplet (“3”) buttons to modify that note length.

Note entry through Sekaiju’s Musical Score window.
Continuing the strings (harmony) track
1. The same procedures as with the Flute track, except that you will be putting notes into the Strings staff. There is no need to explicitly select the Strings track as it already has a separate staff. Notice that it is using a bass staff which makes more sense with the notes we previously entered with the Piano Roll.
As in the previous tutorial, for simplicity, I only used the root of the indicated chords in the transcription and play them an octave below the melody.

Silent Night: Measures 10-21. Flute and strings. The whole song is available as a MIDI file.
Quirks
As the musical score editing behaves very similarly to piano roll editing some unusual things can happen.
- Notes can overlap. You place a note that starts before the previous note of the same pitch ends.
- There is no “page view” or “wrapping”. You have to scroll horizontally to see the rest of the song.
- There is no concept of “voices” so note entry is dependent on position. You can easily create notes that don’t have to be vertically aligned.
- Similarly, there is no concept of rests. For example, if you place a quarter note on an empty bar, it doesn’t necessarily have to be in the start of that bar.
- Notes can not be dragged-resized. Just erase and replace with the right size, or use the Piano Roll instead.
- I haven’t figured out how to tie notes. The last “Peace” note in Silent Night is longer than a whole note, two tied dotted half notes. Of course, this is easy to remedy in the Piano Roll. But this is one of the expected shortcomings of Musical Score editing not a main purpose of Sekaiju.
- Likewise, I also don’t see any quick way to flatten or sharpen a note. This would be used if there are accidentals in the song. This can be done of course, but not like how you normally do it in a full blown score editor.
Moving forward
This is a very simplified version of Silent Night, as the emphasis is really getting familiar with Sekaiju. The MIDI file is available for further study. As an exercise, I would suggest completing the chords by adding thirds, fifths and sevenths instead of just the root notes (refer to a chord chart if necessary). Also the built in MIDI synth of Windows sounds too cheesy to be enjoyable. Hence, a big step (big in improvement, not so much in effort), is to use the MIDI file with Synthfont or other DAWs together with good soundfonts, VST instruments and VST effects.
Also, for what it’s worth: Merry Christmas! :)
Piano keyboard markers for learning to read music
At some point in time I wanted to learn sight reading. Inspired by the idea of fretboard markers [1,2] that helped me memorize guitar scales (I made one myself using office supplies), I made a keyboard marker that combines the features of an actual staff commonly used for children and a turned staff based on Wikimedia’s turned keyboard for note names and midi numbers. I suggest using Blu Tack or something similar to stick it on the area immediately above the keyboard (double sided tape or glue will leave a mess).
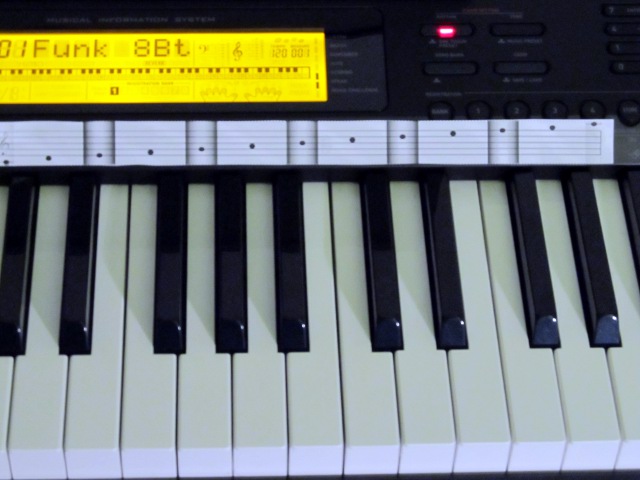
CDP-200R with staff markers. The dark vertical lines point to the notes that are in the lines of the staff.
The size of the markers are based on a Casio CDP-200R which is supposedly standard size. That’s as far as I can remember (exact numbers had long been forgotten now). The whole image/page takes an A4 area (landscape layout) and should be printed with that settings. The image file’s resolution is 300 dpi (3508 x 2480). I aslo made a PDF version available (58.1 KB). The markers come in 4 variants on the same page.
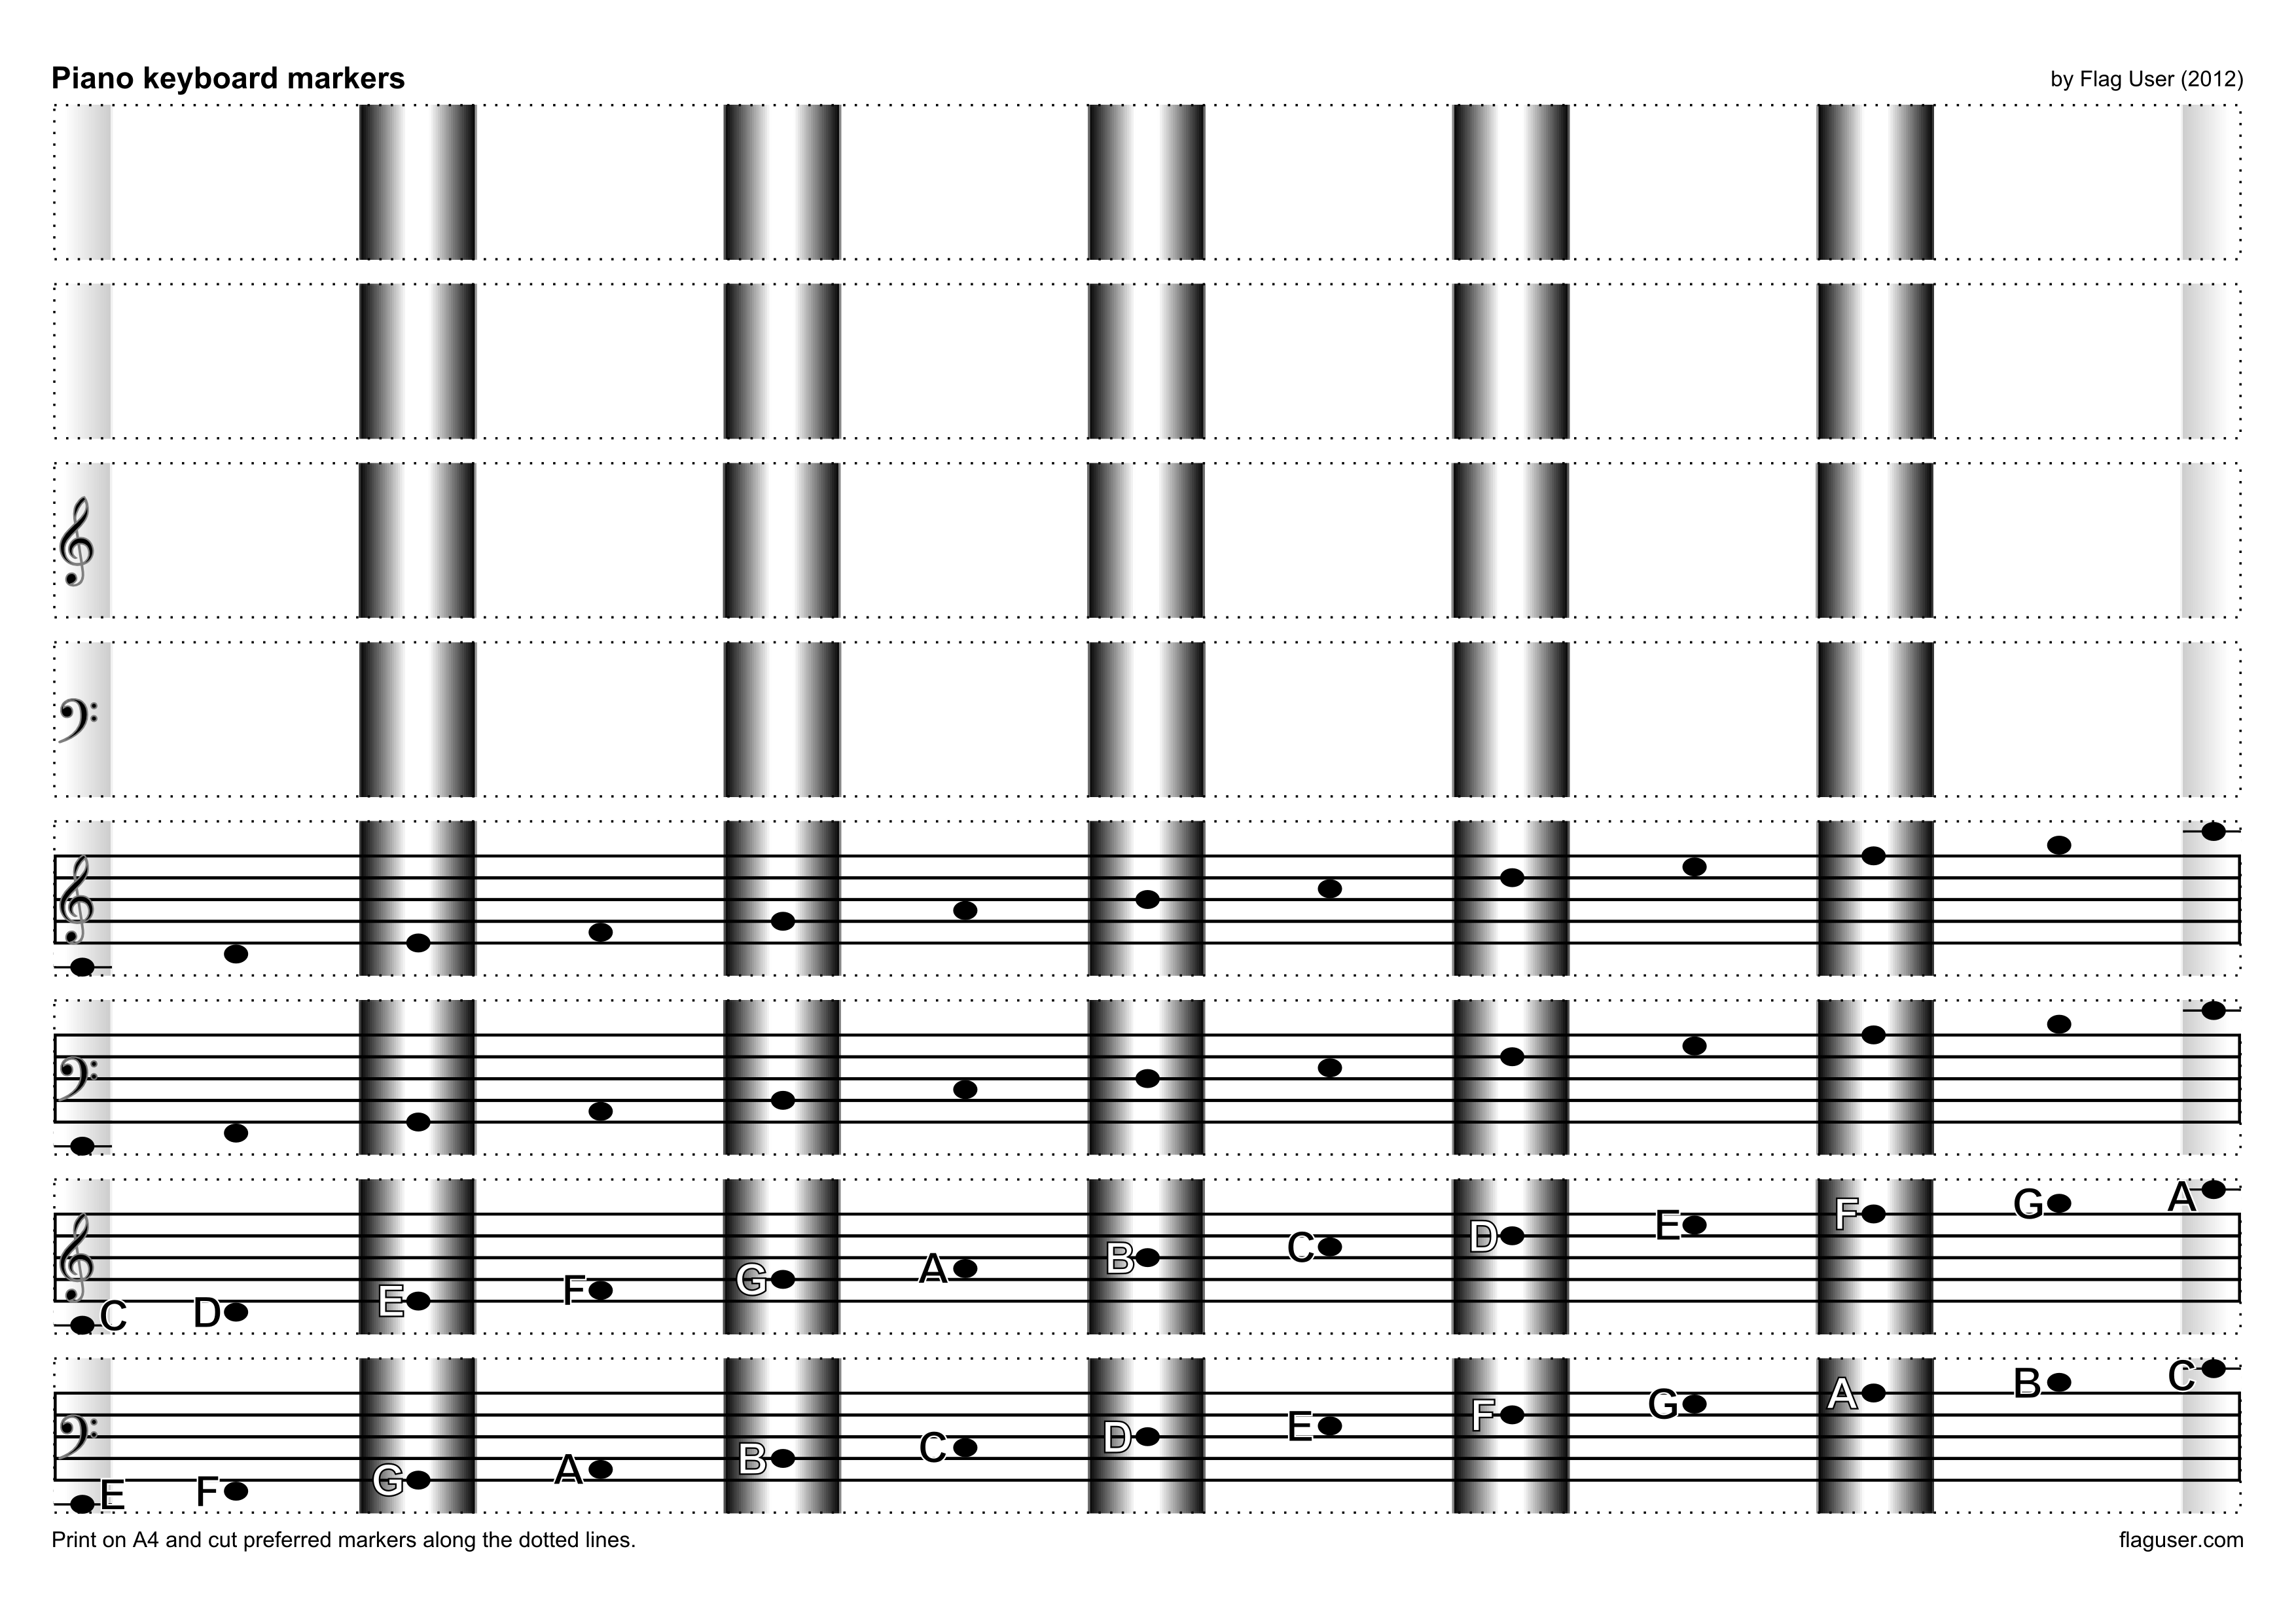
Piano keyboard markers. Print, cut and stick to your piano keyboard. A PDF version is aslo available.
For a while it was helpful, but you need disciplined practice to fully appreciate it. As I hardly have any time to “read” music and I’m usually too tired when I get home, so I mostly play by ear and (muscle) memory, I’m removing it from my keyboard now. As for software assisted learning, I would recommend Prestokeys which is now much more exciting with Windows touchscreen devices getting more common (it’s icon can be seen on the desktop screenshot of my Windows 8 tablet in a previous post). For learning pieces, in a graphical and less mentally challenging way, I use Synthesia with the aid of a monitor mounted on top of my keyboard (I used a netbook in the past). For simultaneously learning pieces and music reading, there is also Piano Booster. And for ear training, there is GNU Solfege.
Happy music learning!
Numbered references
- To be added when remembered :P
- Fret Daddy: http://www.fretdaddy.com/
